Sunday, September 22, 2013

Make your own pop art!

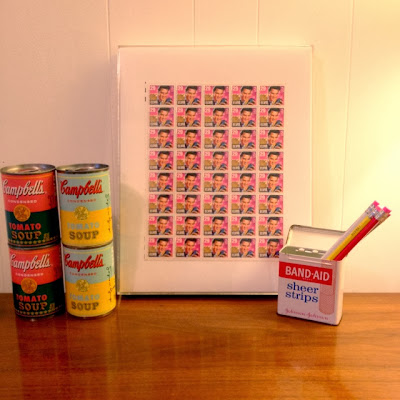
Etsy is mostly known for its' online access to handmade crafts and shops. Have you tried looking for vintage items on there though? It's my favorite resource for handpicked vintage finds, like these 1993 Elvis stamps I recently got. They arrived in a wooden frame, but it wasn't quite what I had in mind. I wanted a way to display my collectable stamps in a tasteful way, not nerdfully stashed away in a scrapbook. By the way, I wish I understood my obsession with stamps. It's really boring.


So, I looked around to see what I had to use...and found a couple frames I recently picked up at Goodwill. I popped the stamps in the boxed plastic frame and holy shit, it looked awesome. The repetition of the Elvis faces channelled Warhol's Marilyn prints. Encased in the acrylic frame, the look became very modern.


What I'm trying to say here is if you want some cheap pop art, you can make it yourself with some stamps and a modern frame. :)

Love,
Kelly

Friday, July 26, 2013

Make a potted herb plant as a quick hostess gift!

Here's an idea. Instead of buying a last minute bottle of wine to take to a party you've been invited to, how about potting a plant for them? I know it sounds time-consuming and daunting, but you can pot a bulk amount of plants and take some as you go! I mean, summer is the time to do it when there is so much going on. I got the idea from my dad a few weeks ago when I was home in Michigan. He bought a flat of different basil varieties (lemon, etc.) from his local nursery and some simple pots from the dollar store. Obviously, you don't have to use them right away. You can care for them yourself until the party day.

Make sure you soak the seedlings in water before planting them so they are quenched and ready to go! He mixed half fertilizer with half potting soil. Don't be scared if the fertilizer bag says "manure" on it; it doesn't smell like manure. You should probably wash your hands after handling it though, to be safe. :P I added images of the mixes my dad used below. He also added mulch to the top for not only a more finished look, but also because it helps hold moisture in the plant. See apartmenttherapy.com's creative ideas for mulch.


I hope you try it!

Love,
Kelly

Tuesday, July 23, 2013

Who drinks tea anymore?

I have too many tea towels. I don't even drink that much tea. I bought this tea towel in London along with a pair of underpants that say "Mind the Gap." I have displayed this towel in my apartment on my bar cart, but thought it time to give it a home to preserve it. I placed it in an Ikea frame I had leftover from a previous trip. Since the towel was white, you could see through it, so I used a sheet of acrylic paper to make it look more pure.


London Tube map tea towel


Pretty Boy
Thanks for reading and congrats to the new royal baby boy :)

Love and cheers!
Kelly

Wednesday, July 3, 2013

Fourth of July Shirt

Hey, it's the 4th of July (well almost) let's make a shirt!

So in full disclosure, I did not go in to making this shirt with the intentions of it being a Fourth of July shirt, but it happened that way, so we're going with it.

(I apologize in advance for the blueness of all these pics, wasn't paying attention to the fact that the carpet is also blue in the sewing room)

What You Need:

1) A Shirt (One that is a little big on you will work best)
2) Ruler
3) Chalk
4) Scissors/Exacto knife
5) Studs (I actually am using star shaped brads)

First, using a ruler draw a straight line with the chalk across the front of the shirt. I made mine right where the V on the neckline exists.

Then, also using a ruler, draw vertical lines from the shoulder seam, down to the horizontal line you drew. I made 10 lines. I wanted 8 strips, so 10 lines.


Cut down all of the vertical lines you just drew. DO NOT yet cut the horizontal line. I used an Exacto for this as it is easier, for me personally, to do that than cut in with scissors. But that is up to you. If you do use an Exacto, make sure to have a cutting mat below, and PLEASE BE CAREFUL. I have seen (and experienced) too many Exacto accidents to not stress that.


Use the Brads, or studs, to connect every other strip you just made. Once you can see which strips you will actually be using, cut out the ones you don't. This part is a little hard to explain, but basically in the end you will only keep every other strip.

Use as many Brads as you like, and connect the strips in whatever pattern you feel like.

Finally cut a slit in the bottom of the shirt along the side. And tie the slit on the side.


That's it! I may pair this with a red tank underneath just to make it extra patriotic.

~Jessica


Thursday, June 20, 2013

Lace Shorts

It's summer! Yay! Hence a lot of not posting here on the blog. Oh well, you should be outside enjoying the weather anyway.

But since it's summer (or tomorrow is, but let's not get picky), that means it's shorts season. I actually am not a huge fan of shorts and tend to lean more towards the skirt/dress option. But if I do decide to wear them, I dont want them riding up and pinching my legs and being super uncomfortable. So one solution I recently found to fix shorts that are a little too snug in the thigh region, is to add a bit of lace to them.


Here's what you need:

A pair of shorts (mine are actually cutoffs as well, but any pair of shorts is fine)
Scissors
Lace (2 pieces, about 6 inches wide and 8 inches long)
Pins
A sewing machine (you could hand sew this if you do not have a sewing machine, but the machine is easier)


First, cut a triangular piece of fabric off the outside part of your shorts. Do for both legs.

Then measure out how much lace you need to fill the gap in your shorts with the lace.


Place the lace on the inside of the shorts and pin in place. Then simply sew the lace in place. When you are done you can trim any excess lace from the inside or hanging off the bottom.


That's it! Pretty easy and pretty cute, better fitting shorts in the end.

~Jessica


Wednesday, June 12, 2013

Photobooth Fun

DIY project for the summer:

Grab some friends, go have fun :)


Love,

The Michigan Made Girls

Monday, June 3, 2013

DIY Cat Scratcher


Cats are very picky creatures. When I find a product that they love, I cling to it. I got a beige floor cat scratcher about 6 months ago and the cats loved it. Anything a cat loves gets destroyed, naturally. So I decided to repurpose it with a non-toxic sisal rope with a little more color. I got the sisal rope from this website: http://pet-rabbit-toys.com/store/diy-rabbit-toy-parts/10-ft-1-4-colored-sisal-rope.

You need about 60 feet of 1/4 inch sisal rope, a staple gun, upholstery staples, and a base to attach it to. This base I have is very simple. Just one long board and two smaller to keep it elevated from the floor.

I laced the rope back and forth rather than roping it all the way around the board because I underestimated the amount of rope I would need. I placed several staples on each rope underneath to secure it in place. Then, I sprinkled with cat nip. :)


Love,
Kelly


Wednesday, May 22, 2013

Blueberry Muffins

I need things that are quick and easy to take for breakfast, as I get up before I am even hungry. So I am usually either eating in the car or eating my breakfast at my desk. But I get sick of meal bars and what have you, so I tend to need to switch things up and therefore thought I would bake some muffins, freeze them and then I can just grab them on my way out the door in the morning.

Here's What You Need:
  • Muffin/Cupcake liners
  • 2 cups all-purpose flour
  • 1 cup oats–quick or regular oats, plain
  • 2/3 cup sugar
  • 1 teaspoon baking powder
  • 1 teaspoon baking soda
  • 1/2 teaspoon salt
  • 12 ounces honey nonfat Greek yogurt
  • 2 large eggs, lightly beaten
  • 4 tablespoons unsalted butter, melted and slightly cooled
  • 1 teaspoon vanilla extract
  • 1 cup fresh blueberries
Start by preheating your oven to 350 degrees. Then line your cupcake tin with the liners (the recipe I followed said that this would make about 12 muffins depending on how much you filled the tins, but I was actually about to make 24. I dunno, I could have filled them more I guess, but still 12 seems like too few for the amount of batter you end up with.).


Next combine flour, sugar, oats, baking powder, baking soda and salt in a bowl. Set aside.

Then combine yogurt, eggs, butter, and vanilla in a second bowl. I should note here, for whatever reason it is hard to find the honey Greek yogurt by me..drives me crazy. BUT if this is the case for you as well, you can just mix in honey with the yogurt before mixing with the rest of the ingredients.

ALSO if you are like me and rushing to get these done on a Monday night and therefore have to at the last second melt the butter, make sure to temper the mixture with the hot butter first before just dumping it in with the eggs (otherwise your eggs will scramble, which you dont want). This simply means add a little bit of the hot butter to the mixture, mix it in well, then slowly add the rest of the butter.

Fold yogurt mixture into dry mixture; stir to combine completely.

Gently fold in the blueberries.


Spoon the muffins into the tins. As I mentioned earlier this will yield anywhere from 12 to 24 muffins, depending on how much you fill your tins. I stuck with about 3/4 full and got 24 muffins.

Bake for about 20-25 minutes or until the tops are golden.

I think I baked mine for slightly too long as they are a little dry in my opinion, but my Dad didn't have the same complaint, so might just be me. Overall good though and great for taking with me in the morning.

~Jessica


Sunday, April 28, 2013

How to get guilt-free cocktails

I have had a recent obsession with mojitos. I can't get enough. Could be the arrival of spring, but they so fresh and so clean.

My mom is coming to visit soon and she loves mojitos about as much as I do. So I will make her some! But today is not so much about the cocktail, as it is the ingredients. I'm always trying to create a more well-rounded bar in my home, but it's quite the investment, so I've been doing it ever so slowly. I'm making a simple syrup to keep around for cocktails. Since my mom is a bit more calorie conscious than I am, I thought I'd make a Stevia version. I read online that there are two different styles of simple syrup. The 1:1 ratio of sugar to water is "simple syrup," or there is the 2:1 ratio that is "rich syrup," which is supposedly the more preferred version among bartenders. Today, I used the 1:1 because artificial sweeteners tend to be sweeter than natural sugar.

I measured how much my container could hold. Then, I boiled water. In a small bowl, I poured 1 cup of Stevia and 1 cup hot water and stirred. Should be a useful recipe in the coming summer months.
:P < drunk face

Love,
Kelly


Wednesday, April 17, 2013

Lightened Up Mac N Cheese

I have had a crazy craving for mac n cheese lately. Like the good, super cheesy, baked kind (not that boxed stuff). So I went on a hunt for a "healthier" version of a mac n cheese recipe, and found one on Eat Yourself Skinny. I was super excited about it and decided to make it for the fam last night.

Here's What You Need:

1 (14.5 oz) box Ronzoni Smart Taste elbow macaroni
1/2 head cauliflower, trimmed and cut into florets
1/2 cup Italian bread crumbs
4 Tbsp reduced-fat grated Parmesan cheese
8 oz. grated sharp cheddar
4 oz. fat-free cream cheese
1/2 cup fat-free half-and-half
1/2 tsp. salt
1/2 tsp. ground black pepper
1 Tbsp flat-leaf parsley, chopped

First preheat the oven to 350 degrees. Bring a large pot of water to a boil...while you wait you can mix your dry ingredients:  In a small bowl, combine Italian breadcrumbs, 1 tablespoon of the Parmesan cheese and the chopped parsley together and set aside. 


Now if things go for you the way they always seem to go for me, and your water takes FOREVER to boil, you can take this time to measure out all of your ingredients. I was actually able to do all of my chopping and measuring while I waited. And if your water still hasn't boiled, do like me and crack open a beer and enjoy while you wait. 

Once your water is boiling, add macaroni and cauliflower. Cook until macaroni is done, then drain, but RESERVE half a cup of the water from the pasta.

Place cheddar, cream cheese, 3 tablespoons of Parmesan cheese, half-and-half, salt and pepper in the already heated pot you just used and mix in the macaroni and cauliflower. Stir until pasta is well coated, then add the water you reserved from the pasta.

Pour the mixture into a greased 9x13 pan. 

Then top with your dry mixture. Bake for 18-20 minutes.

Now I'm going to say here that I was not actually all too thrilled with the end result. It wasn't bad, just kind of plain. The parent's claimed to like it, but it's possible they were just being nice. If I make this again I will definitely be adding more herbs and spices to it to ramp up the flavor a bit. But maybe it's just me.

~Jess


Wednesday, April 10, 2013

Designer Arsenal: Reference Books

Books are great. I love books. I especially love having reference/inspiration books handy. So I thought I would share some books that I have collected over the years.

One book that simply covers the basics of design is Idea Index: Graphic Effects and Typographic Treatments by Jim Krause. It's a fun pocket sized book that makes for easy travel if you are in school and covers simple type treatments.

A book that I was assigned in school was Orbiting the Giant Hairball by Gordon Mackenzie. It is a great little book that can help you get out of creative funks. It kind of helps you remember to think outside the box and not get weighed down by your projects. 

Some other books that I was assigned in school were type specific. And boy do I need help in that area, to this day. Any designer knows that type is extremely important to any design and it is not something to glaze over. So far as I am concerned the more you can learn about it, the better. A couple of books for type are: Thinking With Type by Ellen Upton and Making and Breaking the Grid by Timothy Samara.


In the realm of type, but more along the lines of inspiration rather than instruction are Just My Type by Simon Garfield and Typography Sketchbook by Steven Heller. The latter I actually just got for the BF and it is AWESOME. I had half a mind to keep it for myself, but it has some really awesome images for inspiration.

In terms of general inspiration a great one that was given to me was Everything That Can Happen in a Day by David Horvitz. This one is not so much solely graphic design inspiration, but general creative/think about things in a new way kind of inspiration. It's an all around a fun book, so definitely recommend picking that one up.

I also subscribe to Graphic Design USA, which is a nice way to keep up on trends and things happening in the industry. Plus a bonus is, if you are in the industry, they send you a subscription for free, so can't beat that.

~Jess


Wednesday, March 27, 2013

Eggies

It's almost Easter, and I thought I'd share some Easter egg pictures. These are actually from last year, as we have not yet dyed Easter Eggs this year. But fun nonetheless.

My family has always done Easter eggs with food coloring, rather than the Paas tablets. Well maybe we did them with Paas when I was little, but I dont really remember those days. I definitely prefer using food coloring. The colors are SO much more vibrant and you can make some pretty sweet designs if you play around with it...dip, drip, splotch, smudge, spread it. Just have fun with it, no matter what you'll end up with some cool looking eggs.

I don't recommend using food coloring if you have small children though. If you do, expect for not only the eggs to be dyed, but also the kids, your table and probably yourself. It's messy and that shit stains, so BE CAREFUL. I always wear gloves and lay down a drop cloth of some sort. 


Added fun fact of doing eggs this way: when you crack them, the egg whites will (most of the time) be dyed too. We always had some really fun egg salad sandwiches after Easter in my house.

Happy egg dying!

~Jessica

Saturday, March 23, 2013

Mexican Salsa Recipe

My good friend Angelica made this salsa recipe in college and it is addictively delicious. I've made it myself several times since and it is way better than any salsa you can get in the store or restaurant! it is a pico de gallo style salsa.

Ingredients, yields amount for a small gathering 4-6 ppl:
4 Roma tomatoes
1 lime
1/2 small onion
1 jalapeño
1/3 c cilantro, finely chopped
1tsp salt
1 tsp garlic powder

Dice tomatoes, onion, and jalapeño. Place in medium sized bowl. Mix in cilantro and squeeze in juice of 1 lime. Sprinkle salt and garlic powder over mixture. Stir together. Chill and serve!

Thanks Angelica!! >^^<


Wednesday, March 20, 2013

Scrub-A-Dub-Dub

With the winter dragging on, I find more and more that I simply want to look forward and prepare for summer. Which, for better or for worse, means getting back to the summer beauty regimen and doing things like shaving my legs everyday again (yes, I neglect this habit during the winter, get over it). But that of course means dealing with razor burn and dry skin, but I'm cheap and don't want to spend a whole lot on beauty products either. So I started looking for at home remedies to combat these problems that I could make on the cheap.

Enter the brown sugar body scrub. It's super easy to make and works wonders. I use it before shaving to exfoliate and moisturize, plus it smells really good and will leave you smelling sweet.

Here's what you need:


1-1/2 cups Brown Sugar
1/2 cup Extra Virgin Olive Oil
1/8 cup raw Honey
1/4 teaspoon of desired scent options: Pure Vanilla Extract, Lemon Juice, Lavender essential oil, Fresh ground coffee, Cinnamon or Clove (I used cinnamon in mine, but I might do vanilla next time)

Combine all ingredients and mix until it forms a paste. Store in a sealed container in your bathroom, and no worries about refrigerating, it is not necessary.


To use simply scoop up a handful and rub it in. Enjoy!

~Jess